很多同学和我一样也在用Hexo搭建自己的博客,通常最后发布的操作是 hexo g 生成静态网页,然后 hexo d 将public目录推送到github、coding、gitee等平台。
但是很多时候我们都想偷个懒,只管写博客,写完后将git 一 push,后面的生成部署工作让程序自动完成,github actions为我们提供了这个便利。
在我们博客的github仓库顶部可以找到 Actions 菜单,在里面我们可以搜索、选择各种预备好的actions模板,也可以点击 Set up a workflow yourself 按钮创建自己的工作流。

这里我的部署工作稍微复杂点,所以选择自己编写工作流配置文件。
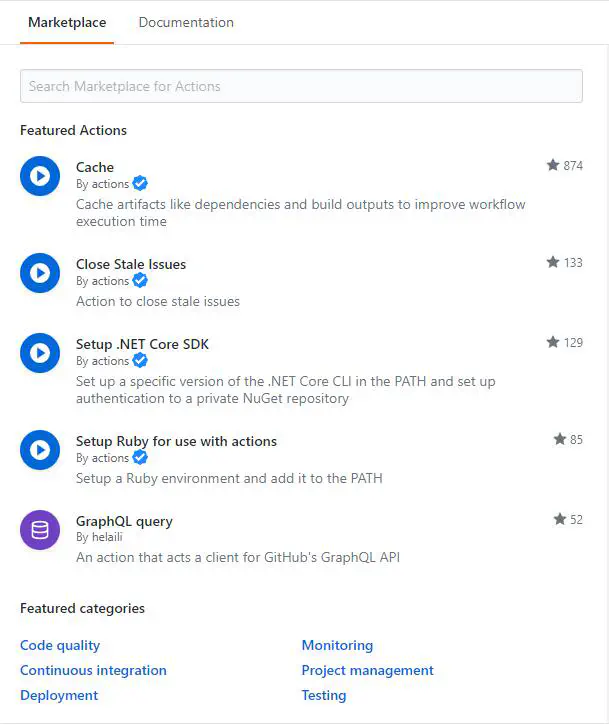
在手动编写面板的右侧可以搜索别人写好的各种actions,方便我们使用这些actions配置一些基本的工作

当然,也可以选择在 hexo 根目录下创建 .github/workflows 目录,并在里面编写github actions配置文件的方法来开启这个功能。
首先我们需要将git库的代码检出到github actions提供的容器中,这里使用github提供的checkout步骤
1
2
3
| - uses: actions/checkout@master
with:
submodules: true
|
因为hexo需要依赖node.js环境,所以我们还要安装node环境
1
2
3
| - uses: actions/setup-node@master
with:
node-version: 12.x
|
有了node环境后我们需要安装各种依赖包
1
2
3
4
| - name: Installation
run: |
npm install
npm install -g hexo-cli
|
依赖装好后就可以执行命令生成静态网站了
1
2
| - name: Generate
run: hexo clean && hexo g
|
最后一步就是将生成的public目录推到github仓库的page分支上,这样github pages就会将最新的网站自动部署了
1
2
3
4
5
6
| - name: Deploy
uses: peaceiris/actions-gh-pages@v3
with:
github_token: ${{ secrets.GITHUB_TOKEN }}
publish_dir: ./public
cname: g.blog.zu1k.com
|
在github actions工作流中,还可以完成更多更复杂的操作,里面可以直接执行shell脚本,可以使用docker镜像提供的特殊环境,大家可以根据自己需求进行修改。
我的配置文件是适合我自己博客用的,里面还包括了网页、js、css、图片的压缩,cdn链接的替换,自动打release方便绕过jsDelivr的缓存。
1
2
3
4
5
6
7
8
9
10
11
12
13
14
15
16
17
18
19
20
21
22
23
24
25
26
27
28
29
30
31
32
33
34
35
36
37
38
39
40
41
42
43
44
45
| name: Hexo CICD
on:
push:
branches:
- master
jobs:
deploy:
name: hexo build & deploy
runs-on: ubuntu-18.04
steps:
- uses: actions/checkout@master
  with:
    submodules: true
- uses: actions/setup-node@master
  with:
    node-version: 12.x
- name: replace cdn url
id: replace
run: |
tagname=$(date +%y%j%H%M)
sed -i "s/hexoblog/hexoblog@$tagname/g" _config.yml
sed -i "s/hexoblog/hexoblog@$tagname/g" themes/cactus/_config.yml
echo "::set-output name=tagname::$tagname"
- name: Installation
  run: |
    npm install
npm install -g hexo-cli gulp
- name: Generate
run: hexo clean && hexo g && gulp && hexo d
- name: Deploy
  uses: peaceiris/actions-gh-pages@v3
  with:
    github_token: ${{ secrets.GITHUB_TOKEN }}
    publish_dir: ./public
    cname: g.blog.zu1k.com
- name: Create Release
uses: actions/create-release@latest
env:
GITHUB_TOKEN: ${{ secrets.GITHUB_TOKEN }}
with:
tag_name: ${{ steps.replace.outputs.tagname }}
release_name: ${{ steps.replace.outputs.tagname }}
body: Automatic generated
draft: false
prerelease: true
|
在github actions将page专用分支更新后,zeit\netlify\github pages三个平台都会自动将最新的内容部署上,这样我就只需要关注博客内容,后续操作都不需要管了

